Document a Dataset
This user guide will explain the steps you need to follow to manually add a health dataset to Mauro Data Mapper.
1. Create a Data Model
Datasets are stored in their own Data Models within Mauro Data Mapper. Therefore, you first need to create a new Data Model. To do this, follow the steps in the 'Create a Data Model user guide'.
Once you have reached step 3, 'Complete New Data Model form' you will need to select the 'Data Model Type' as Data Asset from the dropdown menu.
Fill in the rest of the 'New Data Model' form and submit the Data Model as explained in steps 3.2 and 4.
2. Add a property
Once you've created your Data Model, it's important to record further characteristics of the corresponding dataset, particularly to help gateway providers when designing interfaces.
To do this, select the Data Model in the Model Tree and then click the 'Properties' tab underneath the Data Model details panel. Click the '+ Add Property' button on the right to add a new row to the property table.
Complete the details of the new property as follows:
-
Namespace
This will be used to select the correct profile / selection of properties. -
Key
Where an existing namespace has been chosen, select a relevant property name such as 'contact email'. Otherwise, enter a new property name. -
Value
This is the value of the given property, for example ‘enquiries-mydataset@hub.org’.
You can also add a relevant element to the value of a property. Click '+ Add Element' in the 'Value' column and select the element type from the menu. Search for the element you require and once selected, it will automatically import into the 'Value' column of the properties table.
Once you have filled in the details of the property, click the green 'Save' tick and the new property will be added to the table.
3. Create a Data Class
Each Data Model is made up of several Data Classes which is where data items are both created and managed.
If your dataset is a collection of tables, the conventional approach is to create a new class for each table. Alternatively, you can create a set of classes to provide a more abstract account of the data set, which group and present the data differently to how it is stored and managed.
To create a Data Class, select the relevant Data Model in the Model Tree and click the 'Data Classes' tab on the panel below the Data Model details. Click the '+ Add' button on the right and a 'New Data Class' form will appear.
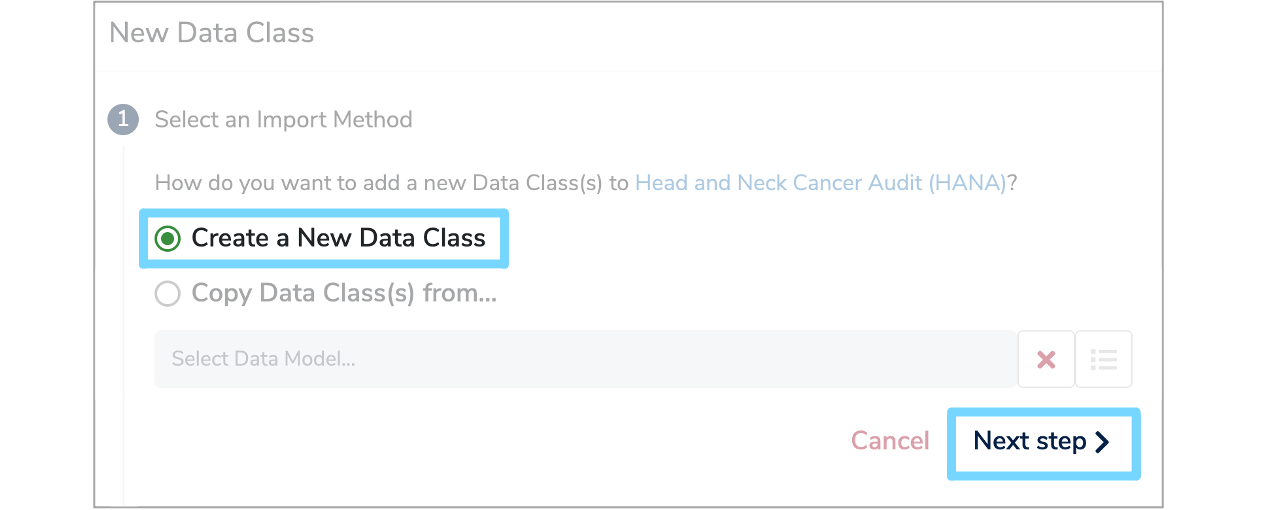
There are two ways to import a Data Class into a Data Model. You can either create a new Data Class or copy a Data Class from an existing Data Model.
3.1 Create a New Data Class
To create a new Data Class, select this option in the first section of the 'New Data Class' form and then click the 'Next step' button.
Now you need to complete the 'Data Class Details' section of the form as follows:
-
Label
Enter a name for the new Data Class which has to be unique within the Data Model. -
Description
Complete a description in either html or plain text which explains the types of data items grouped together within this Data Class. Also include contextual details which are common to the data items, to avoid having to add descriptions to each individual data item. -
Multiplicity
The Multiplicity specifies the minimum and maximum number of times that the Data Class will appear within the Data Model.Optional data may have a minimum Multiplicity of 0 and a maximum of 1, whereas mandatory data has a minimum Multiplicity of 1. Data which occurs any number of times is given by a Multiplicity of * which represents -1 internally.
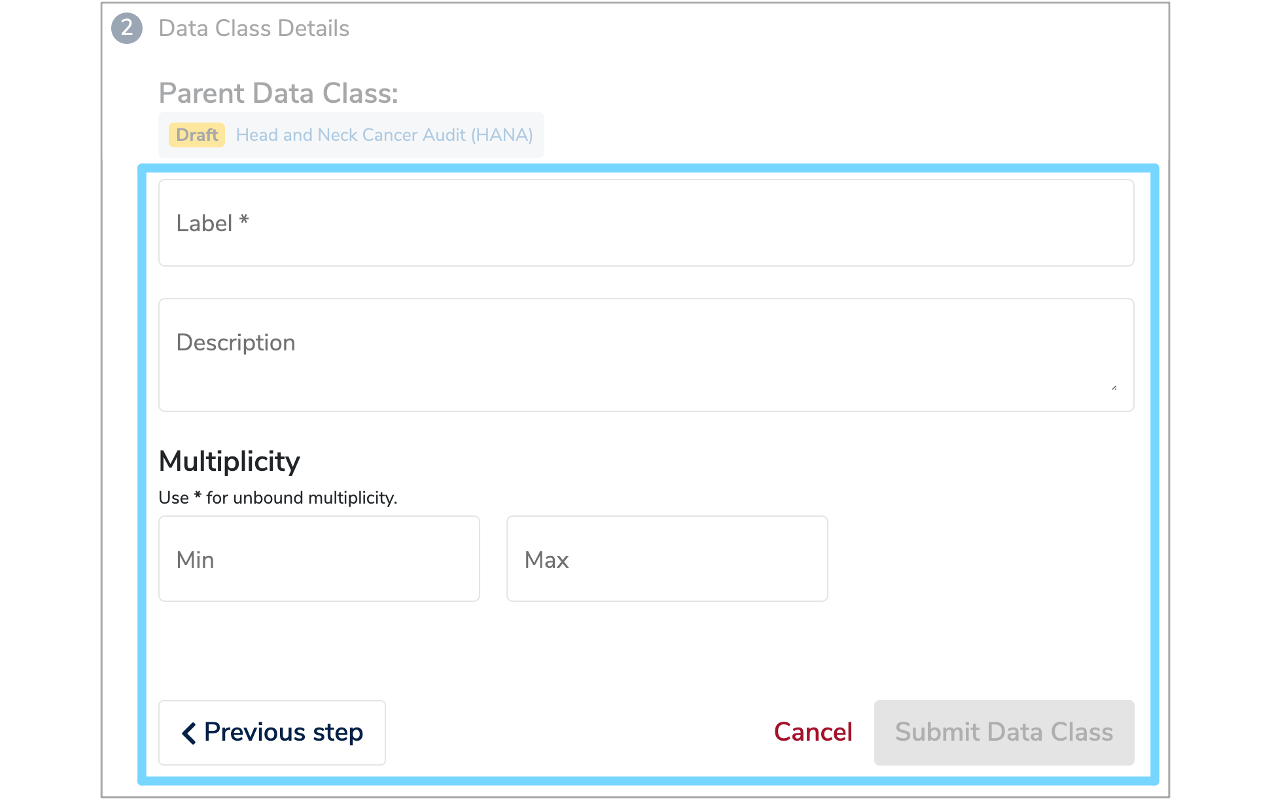
Once you have completed the 'Data Class Details' form, click 'Submit Data Class' and the new Data Class will now be permanently displayed under the 'Data Classes' tab of the Data Model. You can add as many Data Classes as necessary.
3.2 Copy a Data Class
To import Data Classes from an existing Data Model, select the 'Copy Data Classes(s) from...' option in the first section of the 'New Data Class' form. Select the relevant Data Model by either typing the name in the box or clicking the menu icon to the right of the red cross. This will display the Model Tree from which you can then select the relevant Data Model. Once selected, click 'Next step'.
The 'Data Class Details' section of the form will then appear, with a list of all the Data Classes within the selected Data Model. Select the Data Classes you wish to import and then click 'Submit Data Class'. The selected Data Classes will then be imported into your original Data Model, with the progress illustrated by a green loading bar at the bottom of the form.
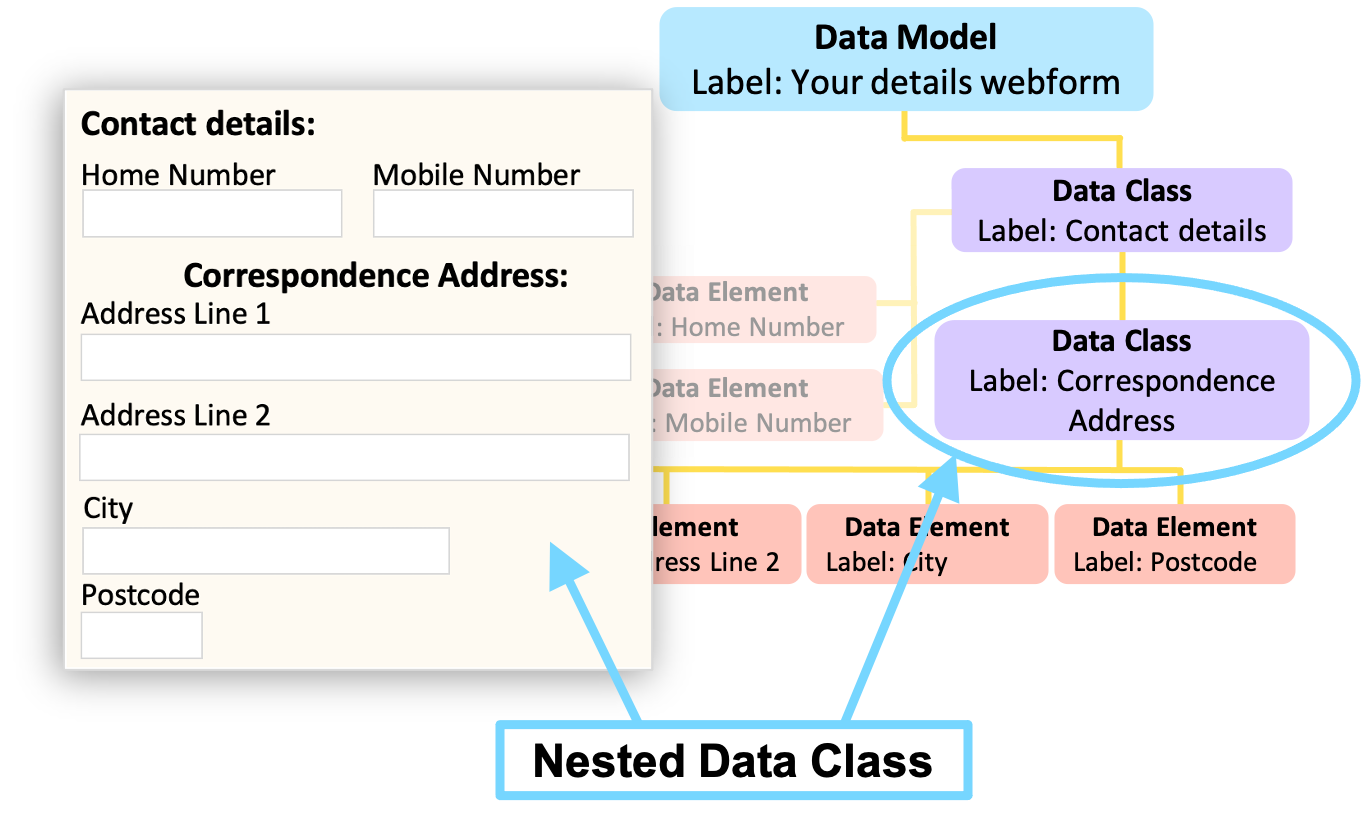
4. Add a Nested Data Class
A useful way of managing complex data sets is to use Nested Data Classes which are essentially a Data Class within a Data Class.
For example, in a webform, there may be a section called 'Contact details', which would be one Data Class. Within that section however, there may be another labelled 'Correspondence Address', which would be a Nested Data Class.
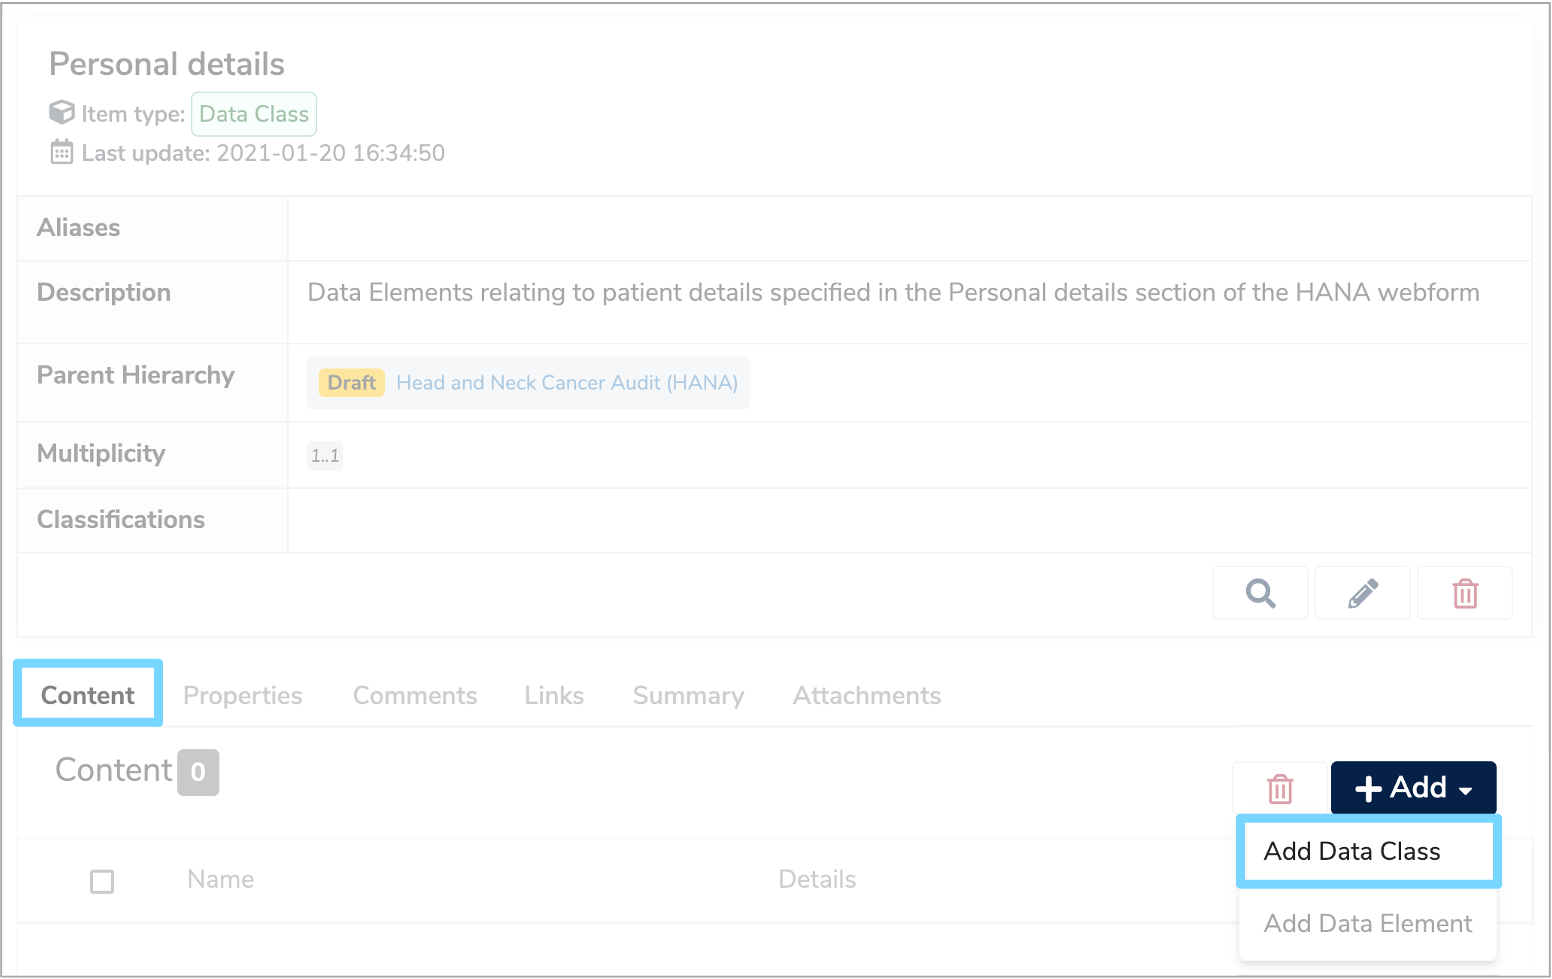
To add a Nested Data Class, click the relevant Data Class from the Model Tree and click the 'Content' tab on the panel below the model overview. Then click '+ Add' and select 'Add Data Class' from the dropdown menu. Complete the 'New Data Class' form as explained above in step '3. Create a Data Class'.
5. Add Data Elements
Within each Data Class lies several Data Elements which are the descriptions of an individual field, variable, column or property of a data item.
To create a Data Element you can use the same approach as creating a Data Class. Select the relevant Data Class in the Model Tree and click the 'Content' tab on the panel below the Data Class details. Click the '+ Add' button on the right and you will be given the choice to either add a Data Class or a Data Element. Select 'Add Data Element' and a 'New Data Element' form will appear.
Similar to adding a Data Class, there are two ways to import a Data Element. You can either create a new Data Element or copy Data Elements from an existing Data Class.
5.1 Create a New Data Element
Follow the steps in '3.1 Create a new Data Class' until you have completed the Label, Description and Multiplicity fields for the Data Element.
Each Data Element then needs to be assigned a relevant Data Type. This can either be selected from an existing list, or you can add a new Data Type.
5.1.1 Select an existing Data Type
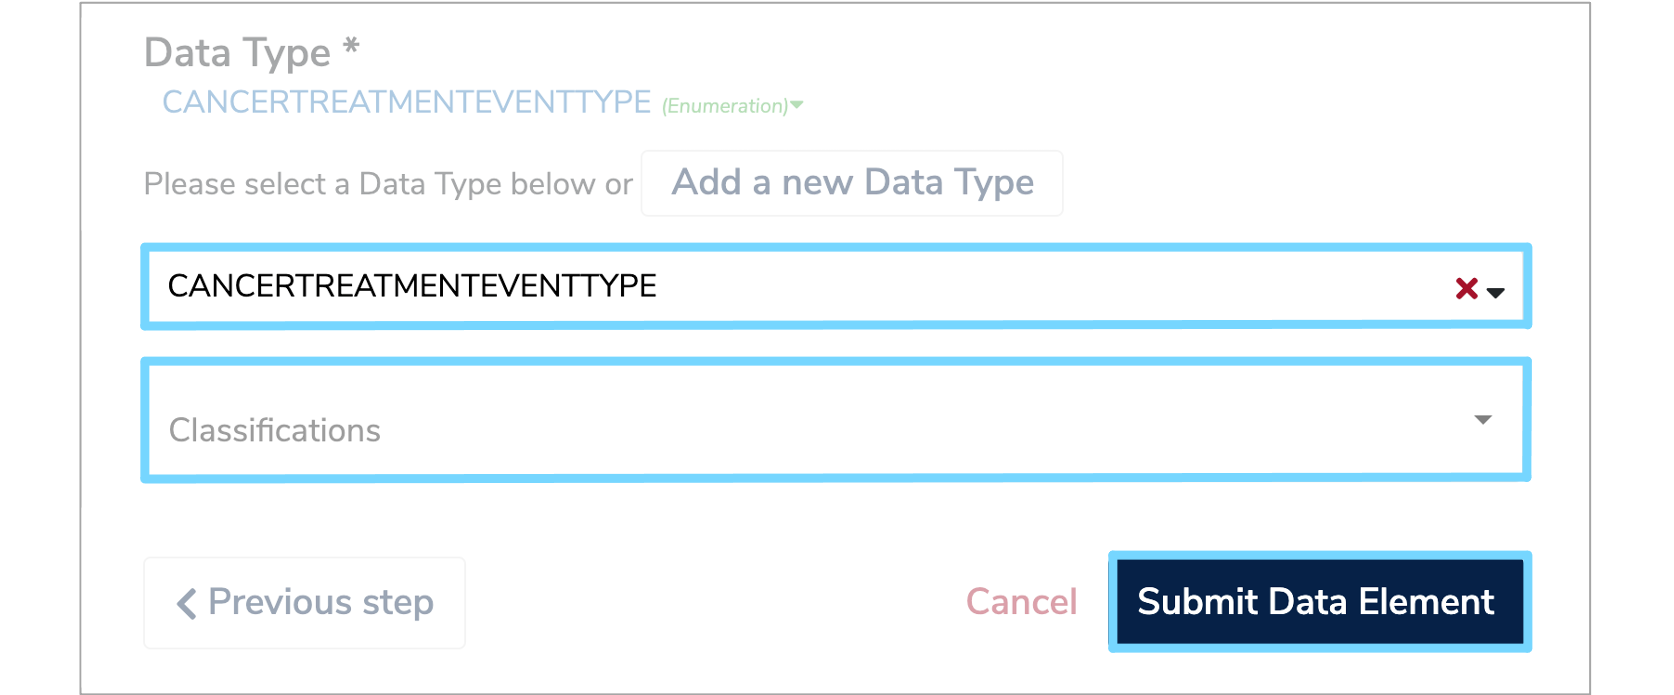
Click the 'Search' box and a dropdown list of existing Data Types will appear. Select the relevant Data Type.
You can then assign several Classifications to the Data Type by selecting them from the dropdown menu. Once all fields are complete, click 'Submit Data Element' to add the Data Element to the Data Class. Repeat this process to add other Data Elements.
5.1.2 Add a new Data Type
To add a new Data Type, click 'Add a new Data Type' on the 'Data Element Details' form. Fill in the Label and Description fields and select the relevant Data Type.
A Data Type can either be:
-
Enumeration:
A constrained set of possible values. Each Enumeration Type defines a number of Enumeration Values which have a coded key and a human-readable value.
If 'Enumeration' has been selected, an additional table will appear where you can add several Enumerations and specify a 'Group', 'Key' and 'Value'. -
Primitive:
Data without further details on structure or referencing. Primitive Data Types include ‘String’, ‘Integer’ or ‘Date’. -
Reference:
Data which refers to another Data Class within the same Data Model.
If Reference has been selected, the Reference Data Class can be selected from a dropdown menu. -
Terminology:
A structured collection of Enumeration Values which have relationships between different data terms.
Similarly, if Terminology has been selected, the relevant category can be chosen from a dropdown menu.
You can then assign several 'Classifications' by selecting them from the dropdown menu.
Once all fields are complete, click 'Submit Data Element' to add the new Data Element to the Data Class. Go back to step '5.1 Create a new Data Element' and repeat the process to add other Data Elements.
5.2 Copy a Data Element
To import a Data Element from an existing Data Class, select the 'Copy Data Element(s) from...' option in the first section of the 'New Data Element' form. Select the relevant Data Class by either typing the name in the box or clicking the menu icon to the right of the red cross. This will display the Model Tree from which you can select the relevant Data Model and Data Class. Once selected, click 'Next step'.
The 'Data Element Details' section of the form will then appear, with a list of all the Data Elements within the selected Data Class. Select the Data Elements you wish to import by ticking the relevant boxes and these will then appear in a 'Summary of Selected Data Elements' table at the bottom of the form. Once you have checked this table is correct, click 'Submit Data Element'.
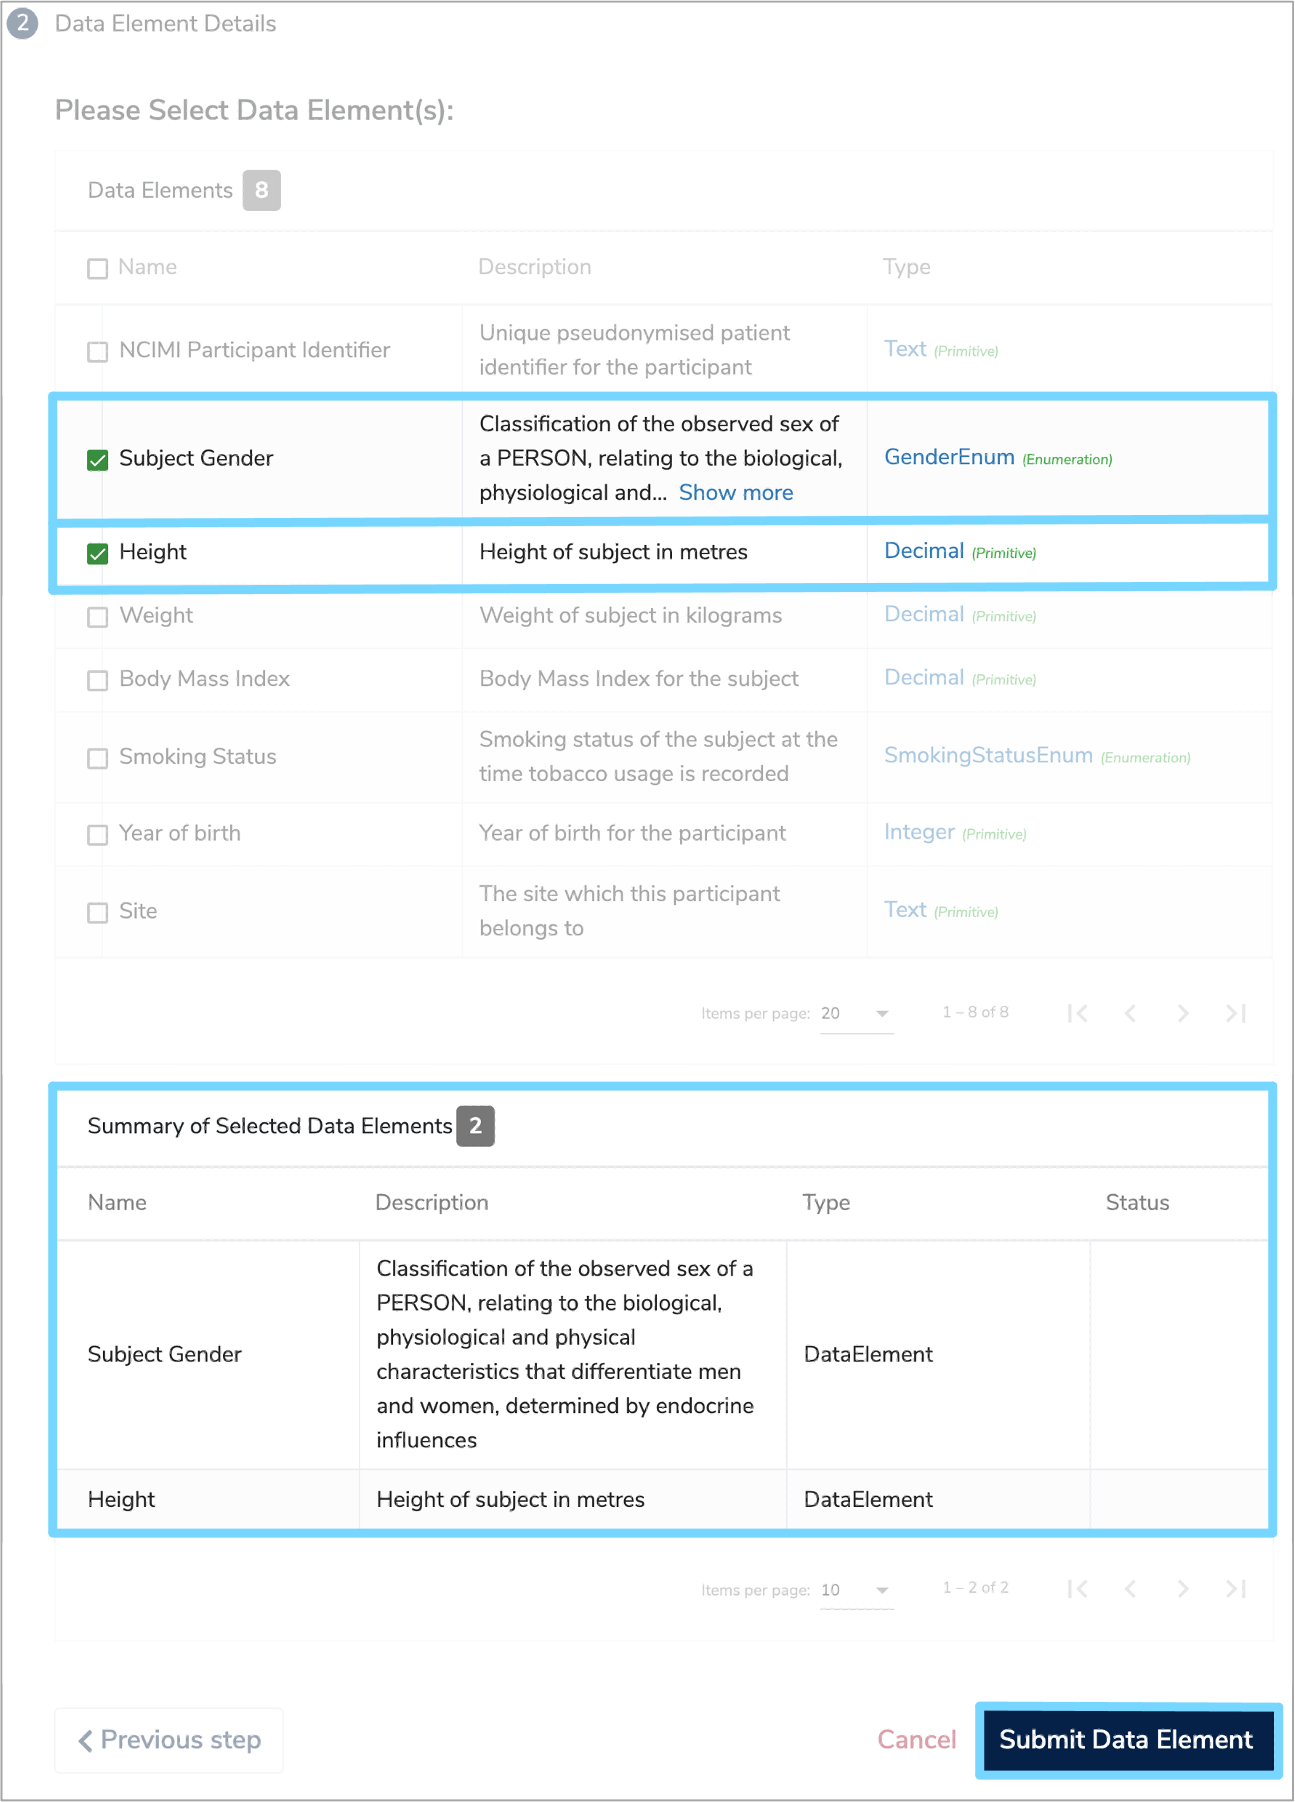
The selected Data Elements will then be imported into your original Data Class, with the progress illustrated by a green loading bar at the bottom of the form.